Showing posts with label SIDE DISHES. Show all posts

Monday, December 12, 2011

CHRISTMAS SALAD

I have plans to serve this red and green salad as a side dish on Christmas eve. Not only is it bright, tasty, creamy and crunchy, but it goes well with almost ANY main course AND it is very festive!!
16 ounce bag of frozen green peas
1/3 cup finely chopped red onion
1/2 cup grated carrot
1/2 cup celery chopped
1 cup thinly sliced mushrooms
1/2 cup red bell pepper chopped
3 slices of crisp bacon cut up (optional)
1/2 cup sharp cheddar cheese shredded (I use more)
cherry tomatoes, cut in half
sunflower seeds

 Microwave the frozen peas (covered) with 1 tablespoon of water for about 3 minutes or until slightly cooked (but not soft) then drain and cool.

In a large bowl, mix all of the above ingredients together (except the cherry tomatoes); gently fold in the dressing.


Dressing
3 heaping tablespoons of light mayonnaise
1 tablespoon freshly squeezed lemon juice
2 teaspoons sugar
1/2 teaspoon black pepper
1-2 tablespoons milk
Whisk the ingredients together and gently fold into salad.


Add cherry tomatoes and an extra sprinkle of cheese to the top of the salad for decoration. Cover and chill.
NOTE: Every microwave cooks at a different rate, so keep an eye on your peas when you microwave them. You don't want them to get overcooked and mushy.

Saturday, July 16, 2011

INDIVIDUAL POTATOES AU GRATIN

Whether you are "empty nesters", newly weds or single, this scaled down recipe is easy, tasty and reheats well too!! The ingredients listed below make six individual au gratins. We found that two of these were perfect for each adult, but the recipe can easily be doubled or tripled.

2 large russet potatoes
1/2 cup grated Colby Jack cheese
1/2 tsp. salt
1/4 tsp. pepper
2 tablespoons heavy cream (per portion)
1/2 cup finely chopped ham or crisp bacon

Peel the potatoes and put them in the food processor along with the ham (or bacon). Pulse the potatoes and ham just until you get pieces about the same size as medium hashbrown chunks. Remove from the food processor and stir in the cheese and salt and pepper.


Spray your cupcake pan with cooking spray and fill each section to the top (patting down VERY lightly). Pour 2 full tablespoons heavy cream over each portion. Cover with foil and bake at 375 for 40 minutes (take the foil off the last two or three minutes and put under the broiler to give them some color).

Remove from oven and let them sit for about 5 minutes before lifting them out of the pan with a large spoon.


These are deliciously creamy, cheesy and "ham-y"; they will go with almost anything. Recipe makes six portions. One portion is perfect for children, but adults can easily eat two portions.

IMPORTANT: If you are using a standard cupcake tin, put a baking sheet under the pan because the cream tends to bubble up a little during cooking.

Sunday, May 1, 2011

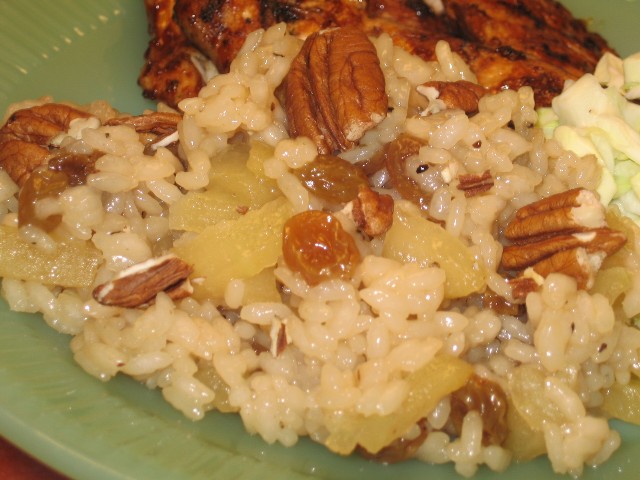
SWEET & SAVORY RICE

I'm the kind of person who likes lots of "extra stuff" in my rice; Picky-Picky Hubby is not. He likes plain white rice...period!! So, when I created this dish, I designed it for ME...rice, apples, golden raisins, toasted pecans...yum. You can imagine my shock when Hubby (with cheeks packed full) exclaimed "this is excellent!!" I almost fell off of my chair!!
.
2 ¼ cups chicken broth
1 tablespoon butter
1 cup raw white rice
½ teaspoon onion powder
½ teaspoon salt
¼ teaspoon black pepper
1 teaspoon ground cumin
1 large cooking apple
1/3 cup dark brown sugar
1/3 cup golden raisins
½ cup chopped toasted pecans
.
Peel and chop the apple into small bite-size pieces. Place everything (except the pecans) in a medium size saucepan and bring it to a boil. Turn down the heat to a low simmer and put a tight fitting lid on the pan. Simmer for 20 minutes. Remove from heat and quickly stir in the toasted pecans. Put the lid back on and let it sit for another five minutes.
.
That's it!! The dark brown sugar and fruit lend a mildly sweet flavor to the rice and the ground cumin gives the flavor a little depth. This is a great side dish for chicken, ham, etc. and it would make an excellent buffet dish since it stays warm and tastes great at room temperature. I hope you will try it.

NOTE: I first posted this about a year ago. Since then it has become one of our favorite side dishes for outdoor grilled meat, it seems to go with just about everything.

Thursday, April 28, 2011

NO FAIL HASHBROWNS FOR THIS WEEKEND

This hash brown recipe is fool proof. It will give you crisp potato patties, just begging for a dash of hot sauce (or ketchup for the kids). The following instructions are for pattys, but you can also spread the mixture out in a big frying pan, then cut into wedges for serving.

3 cups Simply Potatoes (see note below)
¼ cup very thinly sliced green onions
(optional)
1/3 cup all purpose flour
1 egg
(lightly beaten)
1½ teaspoons salt
(or to taste)
¼ teaspoon black pepper
(or to taste)
I use (the shredded hash brown style of) a product called Simply Potatoes (in my store they are sold in the refrigerated section above the eggs), but you can use THAWED Ore Ida shredded (loose) hash browns as well. I have tried fresh potatoes for this recipe and they do NOT work as well as Simply Potatoes or thawed Ore Ida shredded potatoes (fresh potatoes get mushy).
Gently toss the potatoes with the flour, salt and pepper (and onion if you are using it), then gently (I use my hands) mix in the lightly beaten egg. NOTE: I mix the salt & pepper into the egg to make sure the spices are distributed evenly throughout the potatoes.
Pre-heat your heavy frying pan to medium high and brush your skillet with a generous coating of vegetable oil (I like to use my electric frying pan).

Place 1/3 (lightly packed) potato mixture onto HOT, greased frying pan and then gently flatten the mound with your spatula, like this: Fry patties for 4 minutes, per side, or until they are golden brown and crispy.
Drain on paper towels, sprinkle with salt and serve immediately.
I love how these hash brown patties hold together, you can even pick them up and eat them like a commercial hash brown patty, but oh so much better tasting.

NOTE: 3 cups of THAWED Simply Potatoes or Ora Ida equal about a pound.

Monday, April 11, 2011

RED RICE

I am on a never ending search for good side dishes. This is one of my favorite "go to" recipes for seasoned rice. It is FULL of flavor and goes well with just about any choice of meat dish. It is especially handy for a potluck or buffet since it can easily be doubled/tripled and remains tasty at room temperature. We take this with us (already cooked) when we go camping, since it reheats nicely and really "rounds out" those campfire masterpieces Hubby grills. 1 cup raw white rice (not instant rice)
2 tablespoons canola oil
½ cup chopped onion
2 teaspoons chili powder
1 teaspoon ground cumin
½ teaspoon dried oregano
1 teaspoon salt
¼ teaspoon black pepper
15 oz. can diced tomatoes in juice
1 tomato can of water + ½ cup
1 red bell pepper chopped
1 cup red kidney beans

Heat the canola oil, then add the raw rice, onion and spices. Saute this mixture until the onion is transparent and the rice is opaque. Add the red bell pepper, kidney beans, the whole can of diced tomatoes (plus the juice) plus 1 full can of water and another ½ cup of water. Stir well and bring to a boil.

Put a tight fitting lid on the pan and turn the heat down to a slow simmer. Cook for 20 minutes, then turn off heat and let sit for 5 minutes. Fluff with a fork and serve.
NOTE: "Toasting" the spices in the oil/raw rice mixture at the beginning of this recipe really "wakes up" the spices and helps the flavor get deep into the rice.

Wednesday, February 2, 2011

THE ULTIMATE POPOVER

I have been playing around with popover recipes for a while now, so I thought I would "get serious" and buy a popover pan. The pan makes a huge difference, not so much in the taste, but in appearance and how big the air bubbles are inside of the popover. These popovers could not be easier or cheaper to make, and they are such a treat, hot out of the oven with honey butter or strawberry jam!! If you do not have a popover pan, see note at the end of this post.

This recipe is fool proof as long as you follow it closely. Preheat your oven to 425 degrees. I put my popover pan in the oven while it preheats (do not grease before you preheat).
While your oven/pan is preheating, whisk together:
3 eggs
¼ teaspoon salt
1 teaspoon vanilla
1 cup of milk (see note)1 tablespoon melted butter

NOTE: If I have whipping cream, I put about ¼ cup of whipping cream in a measuring cup and then fill the rest of the way with 2% milk...if I have no cream on hand, I just use 1 cup of 2% milk).

After the above ingredients are whisked together well, add one cup of all purpose flour (spoon flour into measuring measuring cup and level off with straight edge). Whisk
everything together for about 30 seconds or until it looks very smooth & creamy.

Take the popover pan out of the hot oven and spray each cup with vegetable spray. Put a small chunk of chilled butter (roughly ½ teaspoon but the exact size is not crucial) into the bottom of each hot cup. Fill each cup half way full (makes six big popovers).

Bake popovers at 425 for 20 minutes. After 20 minutes, turn the oven down to 325 and bake for another 15 minutes. Remove popovers from pan and poke a tiny hole (I use a toothpick) in the bottom of each popover to relieve a little steam (not totally necessary if you are going to eat them right away).


NOTE: If you do not have a popover pan, you can use 6 ounce (oven safe) custard cups (I used the clear Pyrex ones, for a long time, with great success). I placed them all on a cookie sheet for easier handling. The popovers will not get quite as tall (as they do with a popover pan) but they taste every bit as good.

Someone from outside the USA wrote and asked me what a popover pan was, so here is a photo. As you can see, it is almost like a cupcake pan, but the cups are a lot deeper and spaced far apart so the hot air can circulate around each cup.

Tuesday, January 4, 2011

MICROWAVE RICE

This is a handy little recipe for rice cooked in the microwave oven. It is easy, requires no "pot watching" and produces perfect rice.

2 cups boiling water
1 cup long grain white rice (not instant)

Mix everything in a heat safe glass or ceramic bowl and cook on high (uncovered) in your microwave for 10 minutes. Remove and fluff with a fork. Return to microwave and cook at 50% power for another 5 minutes. Fluff again with the fork. That's it!!

NOTE: All microwaves cook differently. If you have an underpowered microwave, you may have to cook it an extra minute on 50% power. If you have a super powerful microwave...maybe subtract a minute during the 50% stage.

NOTE: Add butter and favorite seasonings to rice AFTER it is cooked.

Tuesday, December 28, 2010

GREEN BEAN-MUSHROOM-BACON & CHEESE CASSEROLE

The traditional "green bean casserole" has always intrigued me. I see it mostly during the holidays and I want to enjoy it, although I'm not too fond of the mushroom soup sauce it usually has. This year, I set out to re-invent this holiday casserole and I absolutely love the final results.
.
I used fresh green beans, sauteed sweet onions, portobello mushrooms, crisp bacon, a little cheddar cheese and my own white sauce. The resulting "green bean casserole" was delicious and we ate a ton of it. 1 pound of fresh green beans cut into 2" pieces
½ cup chopped sweet onion
½ pound of baby portobello mushrooms sliced
½ pound of bacon fried crisp (drained well & crumbled)
1 cup shredded cheddar cheese (loosely packed)
1 clove garlic minced finely
3 tablespoons white flour
1 teaspoon salt
scant ½ teaspoon black pepper
2½ cups milk
2 tablespoons butter

In a large frying pan, melt the butter and saute the chopped onions until they smell sweet; add the garlic and saute until it barely turns golden. Add the green beans and mushrooms (mixing well) and saute for a few minutes until they start to wilt just a little (don't cook them all the way through). Remove pan from heat and set aside.
.
In a sauce pan, melt 3 tablespoons butter. When butter is hot, add (all at once) the flour, salt & pepper, stirring quickly. Cook on medium for about a minute (to remove any flour taste). Next, you are going to add the milk, a little at a time, whisking like a mad woman while you add the milk (this will eliminate lumps in the sauce). Once the milk and butter-flour mixture are mixed well, cook on medium heat (stirring every once in a while) until it gets nice and thick.

Remove from heat and stir in the cheese & crisp bacon. Add this mixture to the vegetables and stir well (but gently). Place in an lightly greased casserole dish and bake at 350 for about 30 minutes or until very hot.
.
It was really tasty and the leftovers made a mouth watering lunch the next day.

Monday, November 1, 2010

TOASTED ORZO with PARMESAN & BASIL

This simple (and versatile) little side dish is just delightful. The orzo is toasted in butter before boiling, which adds an extra flavor, then it is tossed with Parmesan and fresh basil. Whether you use it as a side dish or a main dish, it is a very nice change.2 tablespoons butter
1 cup uncooked orzo pasta
2¼ cups chicken broth
½ cup grated Parmesan cheese
¼ cup thinly sliced fresh basil
½ teaspoon salt
¼ teaspoon black pepper
pinch of red pepper flakes
.
Melt the butter in a heavy bottomed pan that has a tight fitting lid. Add the UNCOOKED orzo pasta and stir until completely coated with the butter. Cook on medium-high until the pasta turns golden to lightly brown (watch it because once it starts to turn, it turns quickly).
.
Stir in the chicken broth, red pepper lakes, salt and pepper and bring to a boil. Cover and reduce heat to a simmer. Simmer until the orzo is tender and liquid is (almost) all absorbed. This will take 15 to 20 minutes depending on how fast your simmer is.
.
When orzo is tender, remove from heat and stir in Parmesan cheese and fresh basil. Serve hot.
.
NOTE: Just about anything can be added to this recipe, next time I think I'll include a little crisp bacon & some mushrooms!!!

Tuesday, September 21, 2010

SWEET POTATOES FOR TWO

This was a hard side dish to photograph. You'll just have to trust me, that it is delicious. We get very tired of the same old baked potato or scoop of rice, so this was an excellent change of pace.
. .
Whipped sweet potatoes, sweetened with brown sugar, butter and vanilla, then baked with a crunchy brown sugared pecan topping. Even my ultra-picky Hubby loved this one.
Don't go by the photo, it tastes great!!
1 cup of mashed sweet potatoes
2 tablespoons brown sugar
¼ teaspoon salt
2 tablespoons milk
2 tablespoons beaten egg*
1 tablespoon melted butter
¼ teaspoon vanilla extract

Whip everything with an electric mixer until smooth. Place in a 3 cup (greased) baking dish and top with the following topping. Bake at 350 for 25 - 30 minutes or until hot.

TOPPING
4 tablespoons chopped pecans
2 tablespoons brown sugar
1 tablespoon white flour
1 tablespoon butter
.
Mix topping ingredients (fingers work best) and spread evenly on top of sweet potatoes before baking.

NOTE: I had reservations about the pecans, but they are a wonderful addition to the dish. They are sweet, tender and crunchy and a nice contrast to the soft potatoes, I highly recommend you add them.
.
NOTE: Recipe calls for two tablespoons of egg. I just put an egg in a cup and mixed it well with a fork, then measured out the amount.
.
NOTE: This recipe makes two large servings. If you want more servings, just multiply the ingredients. It's pretty fool proof.

Wednesday, April 28, 2010

CROCKPOT PORK & BEANS (a classic side dish for your barbecue)

It is finally warm enough to cook outdoors here (even though we still have snow in some of the shady parts of the yard), so I'm digging out some tried and true make-ahead side dishes for the up-coming barbecue season.

This is a classic recipe at our house (I fix these beans a lot). They have a great flavor and I often (to save time) make them the day before a barbecue so I can just sit them in a heavy pan on the coolest part of the grill to gently warm while the rest of the food cooks.
2 cups DRY navy beans (see note)
5 to 6 cups of water (see note)
½ cup brown sugar
1 cup chopped onion sauted till sweet
½ pound cooked crisp bacon (crumbled)
3 teaspoons salt
½ teaspoon black pepper
1 teaspoon DRY ground mustard
(1) 8 ounce tomato sauce
.
No need to pre-soak the beans, just put everything in a crockpot and cook on low for 8 to 10 hours depending on how hot your crockpot cooks (see note). Stir once in a while...thats it!!
.
NOTE: I've used this recipe with every kind of dry bean you can imagine. They all work, but the dry white navy beans work the best and don't mush-up.
.
NOTE: Start with 5 cups of water. It will seem really soupy in the beginning, but it will thicken up and the beans will absorb most of the water after 8 hours. Once in a while I have to add that last cup of water if the beans need it...just depends on how much liquid you like in your beans.
.
NOTE: Every crockpot cooks differently. These beans should be done in 8 hours on LOW. I just got a new crockpot (a real gem). It has a timer for low and high and then it automatically kicks over to "warm" which is wonderful for beans...they won't overcook.
.
NOTE: These beans are absolutely delicious on day two & three as well.

Friday, January 1, 2010

STUFFED MUSHROOMS

I made this recipe, for the first time, on Christmas Eve and they were a big hit. I put the recipe together, early in the day and just popped them in the oven for 25 minutes just before dinner. Super simple and absolutely delicious.

12 whole (large) fresh mushrooms

Clean mushrooms and carefully break off stems and reserve. Using a melon baller, scoop the rest of the stem and gills out, making a nice big pocket in the mushroom.
1 tablespoon canola oil
1 large clove garlic minced (more if you like)
(1) 8 ounce package cream cheese, softened
¼ cup grated Parmesan cheese (not powdered kind)
¼ teaspoon black pepper
¼ teaspoon onion powder
¼ teaspoon ground cayenne pepper
Trim off any hardened parts of the mushroom stems and chop the good part of the stems (and gill trimmings) very fine, using a food processor.
Saute the finely chopped stems and pieces in canola oil until all moisture has evaporated (add the garlic to the pan about half way through this step so you don't burn it). Set this aside to cool a little.
When the mushroom-garlic mixture has cooled, mix in the cream cheese, Parmesan, black pepper, onion powder and cayenne pepper; mix very well (it will be very thick). Fill the mushroom caps generously, piling it high on each cap. Place the stuffed mushrooms on a lightly sprayed baking dish (don't let them touch each other) and bake at 350 for 20-30 minutes depending on how large your mushrooms are. Let them sit for a few minutes before serving.
NOTE: I made a double batch (24) of 2½" wide mushrooms (as a side dish) and served it to 8 adults and had no leftovers...so make plenty...they are really good.
Happy New Year!!!
Thank you very much for your kind words of encouragement and support; it means the world to me. Coleen

Wednesday, December 30, 2009

ROASTED BRUSSEL SPROUTS with BACON

As a child, most of the vegetables my mother prepared were from a can or frozen pouch. "Fancy" at our house was canned cream corn. Being British, she did serve us brussel sprouts, cauliflower and cabbage, but they were always boiled for a long time.

In all fairness, I have to admit that I copied moms method of overcooking vegetables for many years. Recently, I discover roasting fresh vegetables in the oven. The texture difference is excellent and the vegetable flavor is intense. It is such an easy method of cooking, I can't believe it took me so long to try it!!


The measurements in this recipe are totally flexible; it is more of a roasting description than a recipe. If you are preparing more than 2 pounds of brussel sprouts, just increase the amount of bacon and onion a little; the roasting time will remain the same.

2 pounds of fresh brussel sprouts
½ cup chopped onion
6 slices of bacon fried and crumbled
salt and pepper

Wash brussel sprouts and drain well. Cut off the hard stem and peel off the outside layer of leaves. Cut them in half and set aside.

Fry bacon until crisp and remove from pan and drain well. Remove all but 2 tablespoons of bacon grease from the frying pan. Saute the chopped onion in the reserved bacon grease and use the moisture from the onion to deglaze the bacon bits from the bottom of the pan. Cook the onion until it just starts to turn transparent.

Put prepared brussel sprouts and crumbled bacon back into the pan (with the onion) and toss to coat the sprouts evenly with bacon grease, add salt and pepper.

Place everything in a 9x13 baking dish and roast uncovered, at 400F for 25-30 minutes.

Wednesday, November 18, 2009

CHEDDAR & BACON HASH BROWN SIDE DISH

I needed an easy side dish to go along with some fried chicken yesterday and decided to throw together some "cheater" Au gratin potatoes. I had a bag of fresh hash browns (called Simply Potatoes) so I decided to use those (they are sold, in our market, next to the eggs). I made a quick white sauce, stirred in the hash browns, some cheddar, a little sour cream and some bacon. What more can you ask for?? They were very cream & cheesy-delicious.

1 package Simply Potatoes
3 tablespoons butter
3 tablespoons flour
1 teaspoon salt
½ teaspoon black pepper
2¼ cups milk
¼ cup chopped onions sauteed
2 cups cheddar cheese shredded
¼ cup sour cream
4 slices bacon fried crisp and crumbled

This is what the potatoes look like:

In a small, heavy bottomed sauce pan, melt 3 tablespoons butter and add 3 tablespoons flour and simmer for about a minute; stir in the sauteed onions and crumbled bacon. Whisk in the milk (whisk quickly, at first, so you don't get lumps) and cook until the mixture thickens. When it comes to a boil, remove from heat and stir in the cheese, potatoes and sour cream. Pour into a greased 2 quart baking dish and bake at 350 for 35-45 minutes or until bubbly and potatoes are tender.

I don't see why you couldn't use frozen hash browns (as long as you thaw them first).

Wednesday, November 11, 2009

BACON MACARONI & CHEESE

This recipe has evolved over the years, to what it is today; one of our (my) favorite side dishes. It's just your basic mac & cheese with a few small tweaks. I've tried it with almost every kind of cheese you can think of and I still like good old American cheese the best.

2 cups mini-penne pasta
4 cups chicken broth
¼ cup finely minced onions, sauteed
2 cups frozen mixed vegetables (corn,peas,carrots)
5 strips of bacon fried and crumbled
3 tablespoons butter
3 tablespoons flour
½ teaspoon black pepper
½ teaspoon ground dry mustard
1 tablespoon dry parsley flakes
2¼ cups milk
1 cup diced American cheese
bread crumbs & butter

Saute the finely minced onions until they are tender and sweet, set aside. Boil the pasta and vegetables (together) in the chicken broth until tender, then drain and stir a tablespoon of butter and set aside.

In a sauce pan, melt 3 tablespoons of butter then stir in 3 tablespoons of flour, parsley, pepper & dry mustard. Stir and cook very slowly (let it just bubble) for about a minute, then add the milk, sauteed onions and bacon (whisk like crazy when you first start to add the milk to avoid any lumps). Stir and cook this sauce until it thickens. Remove from heat and add the cheese. After it sits for a few minutes, stir and the cheese should be mostly melted. Pour over the pasta and veggies and mix well.

Pour into a 9 x 13 baking dish and top with bread crumbs (see note). Bake at 350 for about 20 minutes or until bubbly.

NOTE: Place 2 cups of plain dry bread crumbs in a frying pan and add 2 tablespoons of butter. Toast over medium high heat (stirring) until bread crumbs have absorbed all of the butter and the crumbs are golden. Spread evenly over the macaroni and cheese before putting in oven.

Monday, September 21, 2009

PIZZA-STUFFED PEPPERS

In a recent issue of Pillsbury's Pot Pies & Casseroles cookbook, I found a recipe for Pizza-Stuffed Peppers, made with orzo pasta instead of rice, which intrigued me. They were very easy to make and were quite good. This would be a great recipe for kids. 1/2 cup uncooked orzo
4 cups boiling water
6 small bell peppers
10 ounces ground turkey
1/2 cup diced pepperoni
15 oz. of pizza sauce
1½ cups mozzarella shredded
1/2 cup water
Cook the orzo in 4 cups boiling water for 3 minutes (see note). Drain and rinse with cold water then set aside. Cut top off of bell pepper and clean out seeds and membranes, rinse. If pepper does not sit straight, trim a little off the bottom.
Brown ground turkey and pepperoni over medium-high heat for 4-6 minutes, stirring occasionally, until turkey is not longer pink then drain well. Stir in pizza sauce, 1 cup of cheese and the partially cooked pasta. Divide mixture evenly between the bell peppers.
Spray a 5-6 quart slow cooker with vegetable spray and pour in 1/2 cup water. Stand filled bell peppers upright in slow cooker, replace bell pepper tops. Put lid on and cook on low for 4 to 5 hours. Just before serving, remove pepper tops and top with remaining cheese, cook 5 to 10 minutes more or until cheese is melted.
To remove bell peppers from slow cooker, lift out with large slotted spoon, using tongs to support peppers (do not squeeze).
~~~~~~~~~~~~~~~~~~~~~~~~~~~~~~~~~~
I didn't make mine in the crockpot. Instead, I pre-cooked the empty bell peppers (wrapped in plastic wrap) for 3 minutes in the microwave. I then filled them with the filling mixture and baked them in a 350 degree oven for 25 minutes. I then topped them with lots of cheese (more than the recipe calls for) and baked them another 5 minutes or so until the cheese was all melty.
NOTE: There are several ways to pre-cook the empty bell peppers before you fill them. You can blanch them in boiling water, but I find that microwaving them works better.
NOTE: If you use my method of baking these bell peppers, cook the orzo for the full 9 minutes before mixing it with the rest of the ingredients. I also added about a cup of chopped mushrooms to meat mixture during the last part of its cooking time.

Monday, August 31, 2009

CLASSIC STUFFED POTATOES

I think almost everyone has their own version of stuffed baked potatoes, but for those who don't, I hope you will try this recipe. It is such a versatile dish that you can add just about any ingredient to this recipe to suite your tastes. My favorite version has crisp bacon, sauteed onions, broccoli, cheese, sour cream and butter. It is an excellent side dish for dinner guests because you can make these early in the day and then just heat them up while you are grilling the main course. Stuffed potatoes and a small salad also make a wonderful meal all by themselves.

3 large baking potatoes (1 pound each)
1/2 cup sliced green onions
1/2 cup of butter (divided)
1/2 cup light cream (or less)
1/2 cup sour cream
1 teaspoon salt
1/2 teaspoon black pepper
1 cup cheddar cheese shredded
3 slices bacon fried crisp and drained
1 cup broccoli chopped small

Wash and dry baking potatoes. Bake them (unwrapped) in a 375 degree oven for about one hour and 20 minutes or until easily pierced with a knife. Let the potatoes cool until you can handle them or use a oven glove to protect your hands. Cut potatoes in half, lengthwise; carefully scoop out pulp and put it into a mixing bowl (try not to tear the potato skins). Saute onions until they are tender and sweet in 1/4 cup butter then add them to the potato pulp. Saute the broccoli until tender and set aside.

Removed a few of the "prettier" broccoli florets to decorate the potato tops and set those aside. Mix the potato pulp, onions, remaining 1/4 cup butter, sour cream, cheese and seasonings until very well mixed. Whip in enough of the light cream to make a consistency like mashed potatoes(you may not need all of the cream). Stir in the crisp bacon and small broccoli pieces with a wooden spoon.
Fill potato skins with this mixture (mounding slightly) and top with a little extra cheddar, decorate with broccoli florets and drizzle with a little butter. Bake at 350 for 20 to 30 minutes or until heated through. Makes six half potatoes.

NOTE: If you make these earlier in the day, cover and refrigerate them. At dinner time, bake them at 350 for about 40 minutes.
NOTE: These potatoes are also excellent topped with beef stroganoff or Swedish meatballs.

Tuesday, August 11, 2009

HOME MADE TATER TOTS

This recipe is one the kids will get a kick out of...home made tater tots!! Super quick & simple to make, they are a mixture of chopped potatoes, shredded cheddar, egg, flour, seasonings and fried crisp in a little oil. They are excellent dipped in your favorite barbecue or ranch dressing...inexpensive too!!


2 medium Russet potatoes (see note)
1 cup shredded cheddar cheese (don't pack)
1/3 cup all purpose flour
1 teaspoon seasoning salt
1/4 teaspoon onion powder
1/4 teaspoon black pepper
1 beaten egg

Peel and cube potatoes into your food processor bowl. Pulse them a few times but don't chop them so fine that they become mush. (First picture is the cube size, second picture is the desired chopped size)
In a bowl, mix the chopped potatoes & 1 cup of loosely packed shredded cheddar cheese. Thoroughly mix in the flour (make sure everything is coated). Then add the rest of the ingredients and mix well. Let this mixture sit for about 5 minutes before you fry them. Heat 1/2" vegetable oil to 375.

Scoop spoonfuls of the potato mixture and compress it a little with your fingers while it is on the spoon. Push the "tater tot" off of the spoon (gently) into the shallow (hot) vegetable oil. Fry until golden brown (about 2 minutes per side). Season with salt while still hot.

NOTE: For those of you who live in Alaska, I don't think our Alaska potatoes would work very well in this recipe (the hold too much water and won't crisp up). Recipe calls for Russet (or baking potatoes).
NOTE: For a variation, I am going to try pepper Jack cheese in this recipe instead of the cheddar. I'll let you know how it goes.

Wednesday, July 15, 2009

SHRIMP and BACON FRIED RICE

This shrimp & bacon fried rice has a couple of extra steps, but they are well worth the effort. We love this light, flavorful and quick recipe; it can easily be extended with a few extra veggies and it reheats well.


3 cups of cold COOKED rice
5 slices of bacon (save 3 tablespoons of the grease )
1/2 cup chopped sweet onion
1/2 cup sliced green onion tops
1 pound of RAW jumbo shrimp peeled & de-veined
2 eggs beaten
1/2 teaspoon salt
1/4 teaspoon black pepper
dry crushed red pepper flakes to taste
2 tablespoons soy sauce
1/4 teaspoon sesame oil
Sliced cherry tomatoes for decoration

Spray your largest frying pan with vegetable spray and heat to medium high.
Beat 2 eggs and pour them into a pan, tilting the pan so the eggs spread out nice and thin. When the eggs are starting to "set", sprinkle lightly with a few crushed red pepper flakes. Flip the eggs over and remove from heat. If the eggs don't flip over in one piece, that's ok, just keep the pieces as large and thin as you can. When they are cool enough to handle, roll them up and slice thinly (to get little strips of eggs). This sounds like a hassle, but it is an important part of the dish. Set aside.

Fry 5 slices of bacon until crispy, remove and drain on paper towels (reserve fat) set aside. To 3 tablespoons of the reserved bacon fat, add 1/2 cup chopped sweet onion and saute until tender. Add 3 cups of COLD cooked rice, the crisp bacon, 1/2 cup sliced green onion, 1/2 teaspoon salt, 1/4 teaspoon black pepper, 2 tablespoons soy sauce, 1/4 teaspoon sesame oil and one pound of COOKED shrimp (see note). Toss until everything is well mixed. Gently fold in egg strips. Heat through.

NOTE: The rice for this recipe should be made the day ahead if possible. If not, just make sure the rice is on the dry side and cooled.

NOTE: I use my George Foreman grill machine to cook the shrimp before I stir them into the rice. I just coat them in melted butter and a lot of salt and pepper then grill them for about 2 minutes (depending on size of shrimp). It gives them a nice color. If you do not have a grilling machine, just fry them for a couple of minutes in the pan you cooked the bacon in, then set them aside.

NOTE: If you are using previously frozen raw shrimp, make sure they are completely thawed and drained before you try to fry them (or they will boil as they defrost and get rubbery).

Monday, July 6, 2009

RICE and NO BAKE COOKIES - Two week day classics

When I serve plain white rice, my husband slathers it with butter and white sugar (yuck). To avoid that, I've learned to jazz our rice up a little. This recipe is the result of years of tweaking, and we really enjoy it; I like it because it goes with almost anything. It also keeps my husband away from his sugar rice (lol).

1/2 cup diced onion
1/2 cup diced celery
1/2 cup diced carrot
1 tablespoon canola oil
1 cup of raw long grain rice (not instant)
1/4 teaspoon dried rosemary
1/4 teaspoon dried thyme
1/4 teaspoon dried sage
1 teaspoon salt
1/2 teaspoon black pepper
2 and 1/2 cups chicken broth
1 cup of frozen veggies
sliced green onion tops for garnish
1 tablespoon butter

Saute the onion, celery and carrot in the canola oil until they start to lose their crispness; stir in rice and seasonings; stir to coat the rice with the oil and saute gently for a minute or two. Add the broth and frozen veggies and bring to a boil. When it starts to boil, turn heat down to a low simmer and put a tight fitting lid on the pan. Simmer for 20 minutes. After 20 minutes, turn off the burner and let it sit for five minutes. Add one tablespoon of butter & fluff with a fork and serve.

NOTE: You noticed I use 2 & 1/2 cups of broth, that is more than you would normally use for plain rice. I use this extra amount of broth to give me a slightly saucy rice.
NO BAKE COOKIES
I have used this no-bake cookie recipe since I was in 4-H Club as a kid. It is probably one of my all time favorite cookies. I tend to make them only occasionally these days since I have trouble leaving them alone.

3 cups of dry oats (it's OK to use quick oats - do not use instant)
2 cups white sugar
1/2 cup water
1/2 cup butter
1/2 cup peanut butter
2 teaspoons vanilla
3 tablespoons unsweetened cocoa powder
1/2 cup coconut
Mix sugar, cocoa, water and butter in heavy saucepan. Boil for one minute on med-high heat, stirring constantly. Remove from heat (leave the burner on) and add remaining ingredients. Return to burner and cook on medium for two minutes.
Drop by spoonfuls onto waxed paper and cool. You can speed set these by putting them in the fridge for a few minutes. Store covered.